parallelo.pinwheels progress

Tags

, ,

I’m making progress on the MQG (Modern Quilt Guild) Michael Miller Fabric Challenge Quilt. As the deadline approaches (July 25) it is time to start quilting this quilt and bring it to life. Even though I wanted a larger quilt, I had to stop making blocks so I could finish the top. I made twenty 12 1/2 inch unfinished blocks and will lay them out 4 across and 5 down for a 48 x 60 inch lap quilt. IMG_1232The 3 x 6 inch units that I shared in my July 3rd post were joined to form a 12 1/2 inch x 12 1/2 inch unfinished block. The design is formed by the placement of the fabrics which really necessitates the use of a IMG_1234design wall. I use a design “wall” that is basically the reverse (flannel) side of a plastic tablecloth mounted on a roller, like a window shade. I don’t have wall space for a design wall, so this hangs above my closet and gets pulled down while I am designing quilts. I got mine from IMG_1233Vanishing Design Walls. I find that lightly brushing the fabric with a Staedtler Mini Dusting Brush used by architects is all the effort I need to make the fabric stick to the flannel.

One other tip I have to share today is that I have started glue IMG_1229basting my seams with Elmer’s Washable School Glue. You might have heard about this through the blogosphere. This technique promoted by Christy Fincher (Purple Daisies, LLC). Christy shares techniques used by her mother, master quilter Sharon Schamber. You might want to watch Christy’s video here. It takes a little extra time to glue baste, but I love the accuracy and speed of piecing this way. I do believe that this technique has preventing me from having to un-sew seams when points don’t match up. I find nothing more satisfying than to have points match perfectly. Yes, that is my OCD kicking in. The glue tips sold on Christy’s website are a must for this technique.

I hope you all have a wonderful crafty weekend. Remember, the pleasure is in the process. Lora


Christmas in July and Give Away

Tags

, , , , ,

Last year I waited too late to make Christmas gifts.  My mom fell and broke her hip and all my last-minute plans were thwarted. This year I am starting early. Additionally, the Gainesville Modern Quilt Guild is considering a craft show fundraiser, so I shared some of these gift ideas with them at our last meeting. Maybe this will inspire you to get started on Christmas gifts early.

clutchesClutches – I have experimented with different clutch frames and interfacing. I like the stability that Annie’s Soft and Stable brings to bags, but I haven’t decided which clutch frame I like the best. I have used the tutorial from the Martha Stewart Show here and Lisa Lam’s Easy Peasy Purse pattern (U-handbag) from the current issue (Issue 8) Love Patchwork and Quilting Magazine.

chucksShoe Laces – I took Liesel Gibson’s Creative Bug class on making shoe laces. I love these! I deviated from Liesel’s instructions a bit and used bias strips and stitched with a stretch stitch, as a regular stitch popped when tightening the laces. I’ve received such a positive reaction from these that I decided to carry them in my Etsy shop. I need to schedule a marathon lace making day!

key fobs

Key Fobs – This gift is a staple in my Etsy Shop. I thought some key fobs that matched the shoe laces would be cute. I normally use designer ribbon or leather in my key fobs, but this time I used quilting fabric and I am happy with the results.

placemats

Round Placemats and Napkins – These 16″ round reversible placements are easy to make with Pellon Craft-Fuse interfacing, bias binding and beautiful quilting fabric. The napkins are made using my pattern.

IMG_1191MQG Michael Miller Challenge Quilt – I’m making slow progress on the challenge quilt. What have you been working on?


BooksGiveaway – My last post was my 100th post! To celebrate I would like to give away the book, Quilting With A Modern Slant, by Rachel May. Rachel is a founding member of the Boston Modern Quilt Guild and is a PhD candidate in English and cultural studies with a focus on quilts and narrative. The book is all about modern quilting and more than 70 modern quilt artists. To enter the give away, please leave a comment about your modern quilt journey by July 12th. I will have the drawing on July 13th.

Link up – I’m linking up with Lee over at Freshly Pieced for WIP Wednesday. Please check out the other blogger’s WIP’s and don’t forget to leave quilt love.


GMQ Sew Day – July 27

Tags

, ,

latticebones 627handworksGainesville Modern Quilters have reserved the classroom at JoAnn’s Fabrics for a Sew Day on Sunday, July 27th from 10 am to 6 pm. All members are welcome. The purpose of the Sew Day is for us to spend the day with guild members to share our love of quilting, for experienced quilters to mentor the new quilters and for the members to get to know each other better. Everyone should bring their machine and basic sewing supplies. We will be working on a pattern published by Moda Bake Shop, Lattice Bones by Julie Hirt.

Bella1930sColors-JR-200At our meeting Wednesday night we discussed that it would be helpful if everyone cut their fabric ahead of time, as there isn’t much room to cut fabric in JoAnn’s classroom. Moda Bake Shop patterns promote Moda Fabric Pre-Cut fabrics, therefore the instructions call for 1 jelly roll of print fabric and 1 jelly roll of background fabric. If you are going to use jelly rolls, cut your fabrics just like the pattern directs. I recommend using a jelly roll for the lattice and if you want to use yardage for the background, please see the steps below.

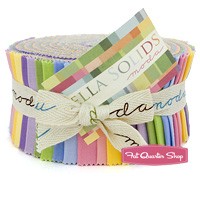
Some of our members may not be familiar with the term “jelly roll.” Jelly Rolls are usually one fabric collection that has been cut into 2 1/2″ strips and rolled up in a jelly roll fashion (usually 40 – 42 strips). The Fat Quarter Shop has a good selection of pre-cut fabrics. Since we don’t have a local quilt shop in our area, I recommend you look online for your jelly rolls if you don’t already have one that you want to use for this quilt.

I am using the “Juggling Summer” fabric collection by Zen Chic for Moda Fabrics. I have saved this jelly roll for just the right project. I am also using Robert Kaufmann Kona Solid White for the background. You will need 2 yards of background fabric. What follows are step by step photos of how I cut my fabric and constructed my test blocks.

IMG_1206
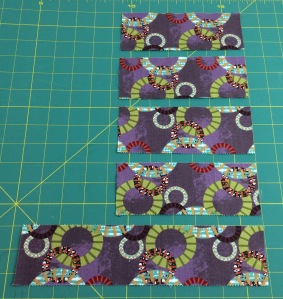
You will be using 32  strips from the jelly roll prints. The basic block consists of four pieced units. Two of Unit 1 and two of Unit 2. The placement of the units in the quilt block creates the lattice design. First let’s cut the fabric:

  1. From each jelly roll print fabric (2-1/2″ strips) cut:
  • Four 6.5″ x 2.5″ segments
  • One 10.5″ x 2.5″ segment

I stack my strips (5-6 strips) before I cut. Make sure you have a new blade in your rotary cutter.

2.  From the 2 yards of background fabric cut:

  • Three 10.5″ strips (across the width of the fabric-40″)
  • Eight 4.5″ strips (across the width of the fabric-40″)

Next:

  • Sub-cut (cross-cut) two of the 10.5″ x 40″ strips of background fabric into sixteen 4.5″ x 10.5″ segments
  • Sub-cut (cross-cut) one of the 10.5″ x 40″ strips of background fabric into sixteen 2.5″ x 10.5″ segments
  • Sub-cut (cross-cut) the eight 4.5″ x 40″ strips of background fabric into 128 – 2.5″ x 4.5″ segments

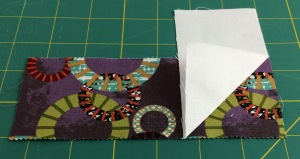
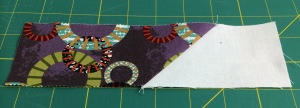
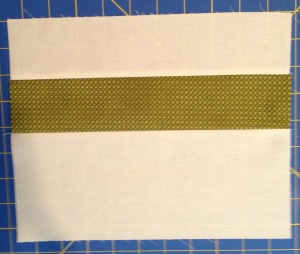
3.  Piece Unit 1: Fold one end of the background fabric (2.5″ x 4.5″) to create a triangle. Press or finger press. Now sew one print piece (2.5′ x 6.5″) to one background on the folded line. Trim the seam to 1/4.” Press (use your preferred method-I press my seams open). Make sure you place the background fabric on the print fabric the same way each time to get the correct angle. Make two Unit 1 pieces for each block.

IMG_1210IMG_1218IMG_1219


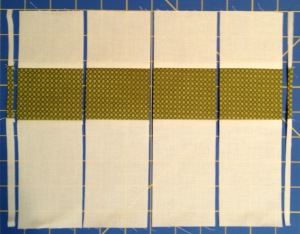
4.  Piece Unit 2: Sew the long edge of the 10.5″ x 2.5″ background fabric piece to the long edge 10.5″ x 2.5″ print fabric piece. Next, sew the long edge of the 10.5″ x 4.5″ background fabric piece to the remaining long edge of the 10.5″ x 2.5″ print fabric piece. Press seams. Now sub-cut (cross-cut) this pieced segment into four 2.5″ units. You will now have four Unit 2 pieces. Use two Unit 2 pieces for each block.

IMG_1142

IMG_1143


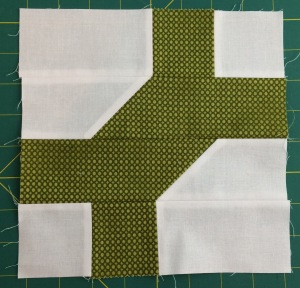
5.  Assembly of Block: Layout two Unit 1 pieces and two Unit 2 pieces and rotate the pieces of the unit until your block looks like a “dog bone” (see photo). Sew four of these blocks to make one large block. You will be making 64 of the “bone” blocks. You should be able to make two blocks from one of the print jelly roll strips.


IMG_1207

IMG_1153


I hope everyone has a great 4th of July. Happy Sewing!
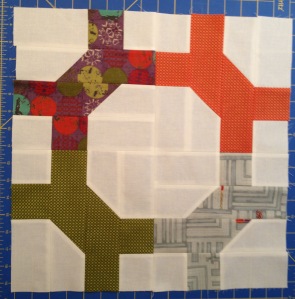
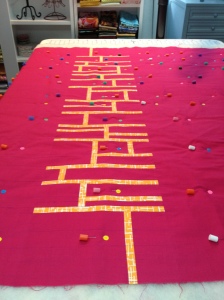
Creating Pattern

Tags

,

100_0432It never ceases to amaze me how pattern is created from simple geometric shapes. I have recently been playing with hexagon shapes, but now I am playing around with the parallelogram shape. Before I ever got the Accuquilt die cutting systems, I made this design for the MQG Robert Kaufman Challenge. I didn’t even realize that I was making parallelograms, as I started with 5″ charm squares, cut them in half diagonally, then inserted strips.

MQG Michael Miller ChallengeAs I started working on the MQG Michael Miller Challenge quilt, I chose the parallelogram shape and starting cutting them and arranging them into a chevron design. It was then that I realized that this was very similar to the Robert Kaufman Challenge Quilt.

Not wanting to make the same type quilt again, I starting playing around with a different arrangement and realized I could create pinwheels by adding half square triangles to each side of the parallelogram. After playing around with the fabric placement in EQ7 I came IMG_1191up with this design, which seems fitting for fabric called “Petal Pinwheels.” I call my quilt “Parallelo Pinwheels.” As the deadline for the challenge approaches, I am not sure how large this quilt will be, but I do hope to finish it in time.

I am linking up with Lee over at Freshly Pieced. Please check out some of the other WIP Wednesday posts and send quilty love to the other bloggers participating in the link up.

Parallelo Pinwheels.PJ7Parallelo Pinwheels.PJ7

WIP Wednesday – MQG Challenge

Tags

, ,

MQG Michael Miller Challenge 1It’s time to get started on the Modern Quilt Guild Michael Miller Challenge and after passing on a few designs, I settled on a parallelogram shape. I cut a bunch of shapes with an Accuquilt Go! die and started throwing them up on MQG Michael Miller Challengethe design wall. I decided that the larger prints did not appeal to me cut up, so I will use some of those pieces on the back of the quilt. What finally appealed to me was this chevron design. I know, it’s been done over and over. I’m a little late to the party. However, I wanted to try some “big stitch” quilting and I think the white negative space would be a good place to experiment with this. Now I need to finish cutting and start piecing.

Another WIP is my “Passing Through” quilt designed by Weeks Ringle and Bill Kerr. At first I spray basted AND pinned the quilt using the method used by Leah Day. You know, I hate pins. Flower pins or safety pins, it doesn’t matter. It slows me down and they get in the way.

IMG_1131A few weeks ago I met Sandi Snow, recent first place winner for her modern quilt entry at the AQS Show in Paducah and she said she uses Micro Stitch to baste her quilts. I used a product like this years ago, but the tacks were much larger. Like the name says, these are micro – 4 mm.  Sandi says you can even sew over them. I’m going to give it a try, I’ll let you know how it goes. See the picture below, you can barely see the micro tacks.

100_2894

I always like to recommend great products that I find, so here is another one. “Flatter” is a Best Press/Starch alternative made by SoakWash. It is the best product I have used for getting stubborn creases and wrinkles out of fabric. I usually use a mixture of 1 part vinegar to 7 parts water as recommended by Ebony Love, however while that is IMG_1147inexpensive and a great solution, I think this product performs better and smells a whole lot better.  If you can’t find at your local quilt shop, you can order it online. The Soak Wash Company is the same group that makes the nail polish to coordinate with your favorite designer fabric and a product to wash your quilts and delicates.

I am linking up with Lee over at Freshly Pieced. Everyone visit her blog and comment on the other WIP Wednesday blog posts. Have a great Wednesday.

Potential converts to modern quilting

Tags

, , ,

IMG_1104100_2874Quilt Guild of the Villages: This week Linda Hungerford (Flourishing Palms) and I descended upon Quilt Guild of the Villages, The Villages, Florida for a lecture and trunk show Tuesday night and two modern quilt block workshops on Wednesday. This quilt guild has over 900 traditional quilters as members. We really enjoyed speaking about our love of modern quilting and sharing our quilts. As a special treat, Linda invited Sandi Snow (Lutz, Florida) to share her blue ribbon winning quilt in the Modern Quilt category at the recent AQS Show in Paducah. Sandi also shared her price winning quilt from an Accuquilt Challenge. Everyone enjoyed seeing Sandi’s quilts. This is the fourth time we have done this presentation to a traditional guild. We love spreading the good word about modern quilting.

IMG_1105At our workshops, 19 students learned to make modern improv blocks. We provided kits so everyone would have some modern fabric. Most students went home with a finished block and seemed excited about them. Here’s hoping that we have some traditional quilters willing to give modern quilting a try. Those quilters in the Central Florida area that would like to attend the Central Florida Modern Quilt Guild should check out their website. They meet the second Monday of every month.

IMG_1085Finishes: I wanted to get the Hexagon Table Runner finished for the guild presentation. It took an entire weekend to do this binding. This was my first time doing this type of binding and I love how it turned out. On the next table runner, I will do a tutorial on how to bind a hexie quilt without chopping off the points.

Craftsy Class: While working on the table runner, I watched Jacquie Gering’s NEW Craftsy Class, “Creative Quilting with Your Walking Foot.” I love Jacquie’s teaching style and I picked up some new tips about walking foot quilting that I plan to incorporate into the next quilt that I am preparing to quilt. NOW is the time to register for a Craftsy Class as ALL classes are on sale. The sale runs through June 9th. I would appreciate it if you use my link (click on the Craftsy widget in the left column or the link above for Jacquie’s class) to register. I will get a percentage of the sale and it will go toward the cost of providing my blog and tutorials.

Thanks so much for visiting my blog. I hope you have a great weekend and get some sewing or crafting done.

WIP Wednesday: Hexy Table Runner

Tags

, ,

Walking Foot Quilting (1)Hexy Table Runner: I finally finished sewing together all the hexies for my table runner and I am in the process of quilting it. I chose one of the fabrics on the front of the quilt for the backing because it has a great pattern to quilt from the back of the quilt with a walking foot.  Keep this trick in mind if you are an inexperienced quilter, especially for free motion quilting. If you have been reading my blog, you know that this table runner was made from my participation in the “Get Your Hex On!” bee.  This was my first bee and this is what I learned:

  • Make sure you realize the time committment you are making
  • Make sure you realize the financial requirements, postage (international), fabric (if pulling from stash), paper pieces
  • Make sure you will be able to work on fabrics that are not your aesthetic; I had a hard time getting motivated when the fabrics were not modern
  • Do your very best work
  • Realize that the quality of work returned to you may not be up to your standards
  • You will get lots of experience and I got so much better and piecing hexies
  • Pay back time: It is all worth it when you start getting quilt blocks returned to you

Walking Foot Quilting (2)It seems like there alot of negatives, but it depends on what you want to get out of the group, online friendships, experience at certain techniques, blocks for a project you are wanting to do. I felt as though I bit off more than I could chew and, therefore, I did not sign up again when this year’s committment was over. I was always late getting my blocks to the owner and I felt bad about that. I always think I can do more than I actually can. However, I love how the table runner turned out and I am so happy to be almost finished.

Group photoFlorida Modern Quilt Retreat: Last weekend I participated in my first retreat. It was a four day modern quilt retreat and I signed up to have some focused sewing time and to be with like minded quilters. I have been making modern quilts for a while now and done several presentations to guilds on modern quilts, so I was already familiar with all the educational aspects of the retreat. It took place in Sebring, FL at the Kenilworth Lodge. The retreat was hosted by Carol Lyle Shaw, President of the Sarasota (FL) Modern Quilt Guild. A good time was had by all and I came back really inspired. I have included a group shot with some of the projects we worked on.

IMG_1076Upcoming Projects: I have several quilts waiting to be quilted and bound. I will use one of them to prepare the much requested tutorial on my machine sewn piped binding technique. I’m also working on a presentation, trunk show and workshop that I am co-presenting with Linda Hungerford of Flourishing Palms on June 3 and 4 at Quilt Guild of The Villages in The Villages, Florida.

New Discovery: I just starting using Instagram (don’t know what took me so long). It is so much fun. If you would like to follow me my user name is @loradouglas. I just had a “like” on one of my pictures from Fons and Porter, how cool is that? I promise I will be posting more on Instagram than on my blog, as it is so quick and easy.

Linky: I am linking up with Lee over at Freshly Pieced for her WIP Wednesday post. Be sure to check out and comment on some of the other WIP Wednesday posts.

Persistence

Tags

,

Persistence2If anything, I am persistent! I just can’t stop thinking about this quilt. I finally realized what I was doing wrong with my piecing. After my English Paper Piecing class at the Gainesville Modern Quilt Guild meeting last Wednesday, I got this brilliant idea that I could piece this quilt in the EPP method. I printed my templates on card stock and proceeded. Well that wasn’t as easy as it seemed and I abandoned it pretty quickly. In the meantime, I examined the templates pretty carefully and actually layed them out according to the key block provided by EQ7. Low and behold,  I realized that I was using some of the pieces interchangeably. Some of the pieces are directional and 4 of the leaf shaped pieces are slightly smaller than the other 4. That would explain the first wonky block I assembled, see my post on March 15 for a photo of the wonky block and the overall quilt design. My husband said “didn’t they explain that in the directions?” I replied, “silly, who do you think “they” is? It is MY design, I should have known better.

Persistence1I am almost finished inserting the center circle and so far the block is flat. I am more encouraged now. This is still a test block and I see that I need to overcut the corner pieces and then square up the block when I am done.

If at first you don’t suceed, try again. Should I finish this quilt, I think I will call it “Persistence.” I am linking up with Lee’s WIP Wednesday post over at Freshly Pieced blog. Check out the other WIP Wednesday blog posts over there.

Finishes

Tags

, ,

Denyse SchmidtI have made a commitment to get some WIPs finished before I move on to new projects. While I always have a backlog of UFOs, I am happy to say that I have finished a few things. But first, I wanted to show you the fabric I snagged at JoAnn’s at 55% off. It is the new fabric line by Denyse Schmidt called Picadilly. I just love it. I have placemats and napkins in mind, but who knows what will inspire me.

Next up, I mentioned a challenge of the Jacksonville Modern Quilt Guild in my last post. We did the “Fold It, Snip It, Rip It, Drop It and Pass It” challenge and I came home with what I thought were pretty disparate pieces of fabric and the Clothesline Pipingstack sat on my sewing table for several months. My thought was that if I cut the fabric up into smaller chunks, the finished project might look OK. I cut the fabric into strips, sewed them together and made fat piping with clothesline. I trimmed the piping very close to the stitching and then secured the clothesline with a large zigzag stitch as I coiled. I have made these before and this is what I have learned: batiks have a tighter weave and don’t fray; also if the strips were Coasterscut on the bias they would not fray and coil easier. These coasters are very absorbent and make nice gifts.

I have been wanting to sell placemats and napkins in my Etsy shop and I had some placemats started for myself. First I made these rectangular placemats with napkins and napkin rings from Lotta Jansdotter Echo fabric line. I had three sets made Placemat3and just had to make one more set to complete the set of four. Unfortunately these fabrics are no longer available, but Windham should reprint this line. It is very cute in brown and white. I think I will keep this set for myself.

Placemat4Next I experimented with some round placemats using this 16″ pre-cut craft pack by Craf-Tex. It is fusible on both sides and similar to some products made by Pellon. I thought this product was difficult to work with in that it took lots of heavy steam to get the glue to adhere to the fabric. I will experiment with some other interfacing the next go around. Anyway, these reverseable placemats are made with Patty Young fabric (green) and Denyse Schmidt fabric (blue and orange). I Placemat1think shoppers on Etsy might be willing to pay for reverseable placemats (more bang for your buck). I love the process of creating and figuring out the most efficient and cost effective way to make something.

I have problems with iron in my water here and my plates were turning orange, so I figured if I bought orange dishes, that Placemat2would solve the problem. I bought Fiestaware plates awhile back, but was disappointed that knife marks show up on the plates and are very difficult to remove. Anyway, they look super cute with the placemats and the table settingcombination looks nice with my stained glass chandelier above the dining table.

Hexie Bee BlocksSo what’s up next on the “finish list?” Sleeves for three quilts I finished last year. Not very exciting, but necessary so I can photograph these quilts to list in my Etsy shop. I also have this stack of hexy blocks from my “Get Your Hex On!” bee that is just wrapping up. More on that in my next post. If you are in or near Gainesville, Florida, come to my English Paper Piecing workshop at the Gainesville Modern Quilters meeting tonight, its free! See you there.

WIPs

Tags

, ,

EPPI need to work this weekend, but I am still managing to squeeze in a little time for sewing to keep my sanity. I thought I would knock out a short post to show you what I am working on. First, I am continuing to get a little hand sewing done with my “Get Your Hex On!” quilting bee. I am starting to get finish blocks returned to me, but in the meantime, I have two more to finish. Here is the December block (almost done) that I hope to get shipped off by Monday. This is the smallest one I have worked on yet-1/2″ sides. You would think it would go fast, but actually, the large hexies work up faster for me. I’ll be teaching a class at the April 2013 Gainesville Modern Quilters meeting on how to do English Paper Piecing. If you are interested, please join us at the Millhopper Branch of the Gainesville Public Library at 7 pm on April 2nd. Bring some fabric, needle and thread. I will bring everything else you will need.

Simple Squared Variation with cNext up, I got some inspiration from a duvet cover I saw in a catalog and designed this quilt in EQ7. I love the design and transparency is something I have wanted to try. I thought this might be a hard quilt to piece and I was right. I made two attempts at this block – my first and last. What a disaster! No amount of steam, pressing or cajoling will make this block square or lay flat. This is just unacceptable. I consider myself a pretty good piecer, but this is ridiculous! Just goes to show, we all have failures some time. But that wavy blockshouldn’t stop you. I snapped a picture of this before it goes in the waste paper basket. I’ll move on to something more satisfying next.

The Jacksonville Modern Quilt Guild had a challenge a couple of months ago. We each brought a yard of fabric and did the “Fold It – Snip It – Rip It – Drop It – Pass It” challenge. I decided to Covered Clotheslinecut the fabric in strips and make some covered clothesline for some coasters. I am making large piping rather than the wrap method that has been popular in the past. Here it is so far. Hopefully this project will be a success. Hope you get to create something fun this weekend.

Lora